Vim: How to break bad habits and boost your productivity
Translated from the Portuguese original.Read the original
In this article
If you're just getting started with Vim, I highly recommend my article on how to get started. Now we're going to talk a bit about the bad habits we pick up when starting out with Vim, and for that you'll need to be somewhat familiar with editing settings and installing plugins.
To understand these bad habits, we first need to understand what Vim motions are.
What are motions?
Most of the time we spend on a programming task, we aren't actually writing code. We're thinking about what to write and where. Stop and think about how much time you spend navigating through files and placing the cursor where it needs to be.
Like any modern tool, Vim lets you use traditional ways of moving around, such as the arrow keys and the mouse cursor. Moving that way can make you extremely slow compared to the motions it offers.
Motions are nothing more than commands you can use to move around inside Vim.
Some examples:
h moves one character to the leftj moves one row downk moves one row upl moves one character to the right
For a list of motions, see all the right moves.
Don't use the arrow keys
As mentioned earlier, Vim has several motions you can use to get around an open buffer, and using the arrow keys is not only considered a bad habit, it can also make you extremely slow compared to using motions.
To break this first bad habit, I suggest you disable the arrow keys and start using motions like: h, j, k, l.
To do that, add the following lines to your .vimrc:
nnoremap <up> <nop>
nnoremap <down> <nop>
nnoremap <left> <nop>
nnoremap <right> <nop>
inoremap <up> <nop>
inoremap <down> <nop>
inoremap <left> <nop>
inoremap <right> <nop>
vnoremap <up> <nop>
vnoremap <down> <nop>
vnoremap <left> <nop>
vnoremap <right> <nop>
With these, the arrow keys will be disabled in normal, insert and visual mode.
If you already don't use the arrow keys, keep reading. If you still do, disable them and try working the recommended way for a while. At first you'll feel slow and hit the wrong keys a lot, but once you build muscle memory they'll become natural and easy to use.
Rethink pressing the same key over and over
Any excessive repetition of a Vim motion can also be considered a bad habit, and there's surely a motion you can use to edit faster.
Picture the following sentence:
Mussum Ipsum, cacilds vidis litro abertis.
Now imagine we want to edit the word Ipsum by removing the letter u (leaving Ipsm). Using the motion l until we reach the letter u, we could use the following motions
wlllx -> moves to the start of the next word, then moves 3 columns to the right and deletes the current column.
Now imagine repeating that motion many times a day to move between words and lines, something we tend to do without noticing (e.g.: hhhhh, jjjjj, kkkkk, lllll).
Instead, we could use simple word motions like f{character}, which gives us wfux. Or even move between lines (example: 50G, moving to line 50 without pressing the j motion 50 times).
I recommend spending some time studying the image below to understand Vim's motions, commands and operators.
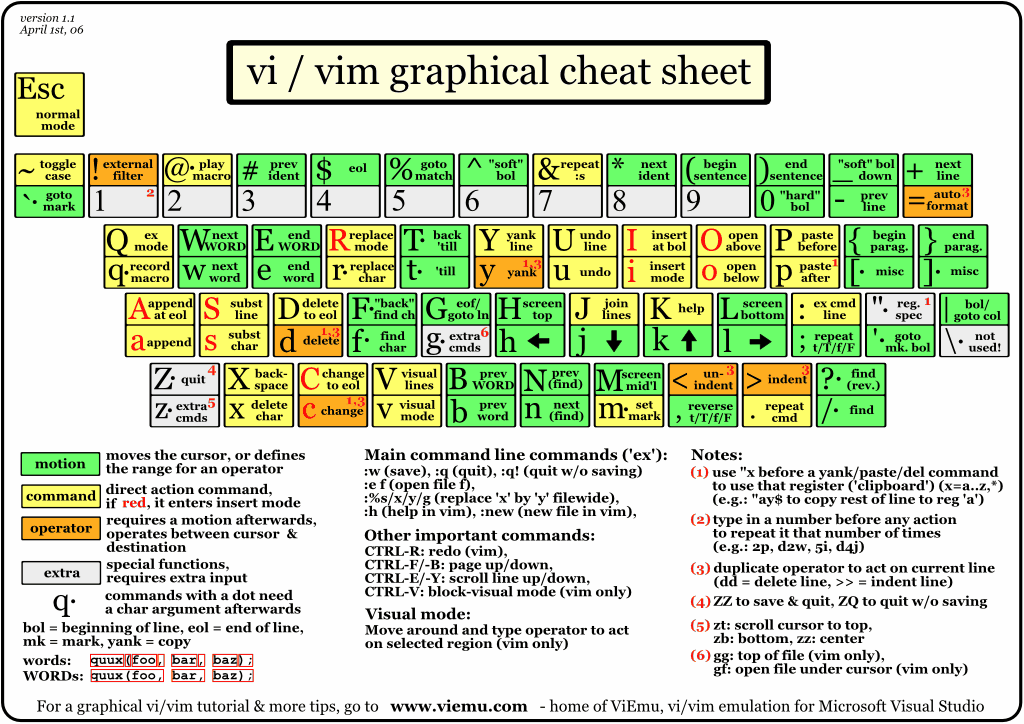
Figure 1: Vim Cheat Sheet: Courtesy: http://www.viemu.com
Hardtime plugin
With these repetitions and bad habits in mind, developer Tom Cammann created the vim-hardtime plugin. It works by simply adding a timeout to the repetition of the keys you define.
For example, say we want the plugin to stop me after I've used the h motion twice, so that when I try to use it a third time it blocks me until 1000 milliseconds have passed.
At first it will be frustrating and you'll feel your productivity dropping, but over time, as you use other motions, you'll notice it going up.
Install the plugin and give it a try.
You can also customize some settings:
Adding settings to the plugin
Turns it on by default when you open a file:
let g:hardtime_default_on = 1
Shows messages in the status bar (example: when a motion was blocked):
let g:hardtime_showmsg = 1
Limits a motion to the number of times you set:
let g:hardtime_maxcount = 2
Disables the plugin for certain buffer patterns (in the case below, it disables it for the Nerdtree and Buffergator plugins):
let g:hardtime_ignore_buffer_patterns = [ "CustomPattern", "NERD.*", "Buffergator*" ]
It also lets you disable some keys (like we did at the start of the article, you can use the setting below without having to use nnoremap, inoremap, vnoremap):
let g:list_of_disabled_keys = ["", "", "<LEFT>", ""]
You can also map a key to turn the plugin on and off (super useful when you're starting out with it, to avoid a lot of frustration). In my case, pressing my leader key followed by ht turns the plugin on or off:
nnoremap <leader>ht <Esc>:call HardTimeToggle()<CR>
Conclusion
In the previous article, I said that Vim's learning curve is steep, but that over time the editor becomes a pleasure to use. Motions are there to help our productivity. In Vim, there are many motions and many ways to do the same thing. Think about how you're using these motions and whether there's a better way to do the same thing.